In part 1 of this mini series I talked about some of the basics of Chaos Engineering and how Azure Chaos Studio can be used to perform experiments in a reliable, repeatable and safe manner. In this blog post I’ll be looking at how to automate the execution and observation of the experiment I created previously to enable us to add regular resiliency testing to our development lifecycle.
By including resiliency testing in our CI/CD pipeline we can increase the chance of catching changes that will degrade our system’s resiliency before they are released to production. It is common to perform end-to-end tests, load tests, stress tests and security tests before releasing changes to a system and resiliency testing is another great string to add to your bow.
In this post I’ll be building upon the same GitHub repo as part 1 - you’ll find all the code discussed in this article in there.
The Tools 🔗
In the previous post I demonstrated how to build Azure Chaos Studio using Bicep and how to observe the effect of the experiment using PowerShell. In this post I’ll be adding a couple of tools to the belt: GitHub Actions and k6.
GitHub Actions 🔗
In the unlikely event of you not being aware of what GitHub Actions are then I’d recommend you visit github.com to find out more. I’ll be using GitHub Actions to build a pipeline (or “Workflow” using GitHub’s lingo) that deploys an instance of my test infrastructure (see The Test Environment for a reminder on what this looks like), initiates my Azure Chaos Studio experiment and then runs a load test to observe the effect of the experiment.
k6 🔗
k6 is an open source load testing tool which can execute tests written in JavaScript. It allows you to define checks and thresholds which can be used to set pass/fail criteria on test executions. We’ll be using k6 to observe the results of the chaos experiment and report the result back to the GitHub Actions Workflow. In part 1 I used a small piece of PowerShell for this which was great for quick interactive testing - I decided to replace this with k6 rather than having to write the threshold and reporting logic myself.
k6 have a GitHub Action available too which will make running the test in the Workflow very simple to configure.
Building the Workflow 🔗
I decided to split my Workflow up into two jobs: one for deploying the infrastructure and another (dependant on the first) for executing the tests - honestly I don’t have a good reason for doing this other than it seeming like a neat way to organise the various steps… 🤷♂️
To start the Workflow I created .github/workflows/chaos-tests.yml (you can find the full Workflow here) and added the following initial code which gives the Workflow a name, adds a workflow_dispatch (i.e. manual) trigger and defines some basic environment variables used for resource naming:
name: chaos-tests

on:
  workflow_dispatch:

env:
  loadBalancerPipName: lb-pip
  disconnectExperimentName: half-vm-disconnect
  resourceGroupName: chaos-playground

jobs:
Building the Deployment Job 🔗
The next step was to add a job containing the steps for deploying an instance of my test infrastructure using the Bicep templates. Before our Workflow can think about deploying anything to Azure, it will need to authenticate and get request an access token to use to initiate the deployment. This requires creating an Azure AD service principal and storing its details in a repository secret - I followed the instructions found here to do this. With that in place I could add a step calling the azure/login@v1 Action to authenticate the Workflow using the credentials.
My Bicep deployment requires the admin password for the VMs to be passed in as a parameter, so I also added a repository secret called VM_ADMIN_PASSWORD.
With authentication and admin password taken care of, deploying the Bicep is a simple case of running the Azure CLI command az deployment sub create -l uksouth -f ./iac/main.bicep -p adminPassword=${{ secrets.VM_ADMIN_PASSWORD }}.
Since this deployment is transient there’s no way to know in advance what the public IP address of the load balancer will be, and this is crucial information for the k6 test (it needs to know where to send HTTP requests right..?) - I added a couple of commands to run after the deployment to capture this and expose it using a job output. See GitHub’s documentation for more information about job outputs.
The code for this job is as follows:
  deploy:
    runs-on: ubuntu-latest
    outputs:
      publicIp: ${{ steps.deploy-bicep.outputs.publicIp}}
    steps:
      - uses: actions/checkout@v2

      - name: Azure login
        uses: azure/login@v1
        with:
          creds: ${{ secrets.AZURE_CREDENTIALS }}

      - name: Deploy bicep
        id: deploy-bicep
        uses: azure/CLI@v1
        with:
          inlineScript: |
            az deployment sub create -l uksouth -f ./iac/main.bicep -p adminPassword=${{ secrets.VM_ADMIN_PASSWORD }}
            pip=$(az network public-ip show -n $loadBalancerPipName -g $resourceGroupName --query ipAddress -o tsv)
            echo "::set-output name=publicIp::$pip"
Building the Test Execution Job 🔗
This job is a little bit more involved. I had two things to figure out before I could build the job: firstly, in part 1 I used the Azure Portal to start the Chaos Experiment, so I needed to find a way to do this programmatically; secondly, I needed to write the k6 test that would perform the observation.
Initiating the Experiment 🔗
Since Azure Chaos Studio is in its early days (at time of writing at least), the management tooling is … lacking. What I mean is that there’s no Azure CLI or Azure PowerShell support, so in order to start my Experiment programmatically I had to resort to the Chaos Studio REST API. Another thing to think about was that Chaos Experiments can take a minute or so take effect (they transition through an initial pending state) - I needed to add a wait to ensure that observation doesn’t start until the Experiment’s in full swing.
I put together the following shell script which gets the Experiment’s resource ID, uses the Azure CLI to invoke the REST API for starting the Experiment and then periodically checks the status of the Experiment (again using the REST API) until it is “Running”:
#!/bin/sh

RESOURCE_GROUP=$1
EXPERIMENT_NAME=$2

# get the resource id for the experiment and construct the start rest api url
EXPERIMENT_ID=$(az resource show -n $EXPERIMENT_NAME -g $RESOURCE_GROUP --resource-type Microsoft.Chaos/experiments --query id -o tsv)
START_URL="https://management.azure.com${EXPERIMENT_ID}/start?api-version=2021-09-15-preview"

# start the experiment and capture the status url
STATUS_URL=$(az rest --method post --uri $START_URL --body '{}' --query statusUrl --output tsv)
STATUS=""

# wait for the experiment to transition to 'running'
while [ "$STATUS" != "Running" ]
do
    STATUS=$(az rest --method get --uri $STATUS_URL --query properties.status --output tsv)
    echo "Experiment status: ${STATUS}"
    sleep 5
done
Writing the k6 Test 🔗
As I mentioned above, k6 tests are written in JavaScript. I won’t spend time explaining the syntax - the documentation is great so I’d recommend checking it out. k6 is super flexible and enables users to build quite complicated load testing scenarios - my requirement is quite simple though: all I need it to do is fire a bunch of requests at the front-end of my load balancer and report the success rate back.
The first thing I needed to do was to create my test file (tests/k6.js), add the necessary import statements and then define some options for the test. Options allow you to control things like how long to run the test for, how many users to simulate and what the success thresholds are. I decided to define the following thresholds: the 95th percentile of requests must complete in under 500ms, and over 95% of the checks I’ll perform in the test (I’ll come on to those in a minute) must be successful. I also had to enable the noConnectionReuse option to ensure the load balancer sees the requests as individual and separate.
Next I had to define a function containing the test logic. First I defined a timeout parameter for the HTTP requests (2s) and then I constructed a URL using the HOST environment variable (which will be set by the GitHub Actions Workflow using the value obtained in the first job). Next I executed the request and then used k6’s check() function to assert that the status code of the request should be 200 - if it isn’t then the check will fail and will count against the threshold defined earlier.
The entire test script looks like this:
import http from 'k6/http';
import { sleep, check } from 'k6';

export const options = {
  duration: '1m',
  vus: 15,
  thresholds: {
    http_req_duration: ['p(95)<500'],
    checks: ['rate>0.95']
  },
  noConnectionReuse: true
};

export default function () {
  const params = {
    timeout: 2000
  }
  const url = `http://${__ENV.HOST}`
  const res = http.get(url, params);
  check(res, {
    'status is 200': (res) => res.status === 200,
  });
  sleep(1);
}
Putting it Together 🔗
Now that I have the code for starting an Experiment and for observing the effect, I can put the second Workflow job together. Since it will need to use the Azure CLI, I had to use the azure/login@v1 Action again - perhaps it would have better to run this in a single job…? I decided to run my k6 test twice, once as a baseline before the Experiment and once during the Experiment. I didn’t think it would be useful to measure the effect of the Experiment if the system is in some unknown degraded state.
The job looks like this:
  run_disconnect_test:
    runs-on: ubuntu-latest
    needs: [deploy]
    steps:
      - uses: actions/checkout@v2

      - name: Azure login
        uses: azure/login@v1
        with:
          creds: ${{ secrets.AZURE_CREDENTIALS }}

      - name: Run k6 test (baseline)
        uses: k6io/[email protected]
        env:
          HOST: ${{ needs.deploy.outputs.publicIp }}
        with:
          filename: ./tests/k6.js

      - name: Start half disconnect experiment
        uses: azure/CLI@v1
        with:
          inlineScript: |
            chmod +x ./scripts/start-experiment.sh
            ./scripts/start-experiment.sh $resourceGroupName $disconnectExperimentName

      - name: Wait for NSG changes to take effect
        run: sleep 180

      - name: Run k6 test
        uses: k6io/[email protected]
        env:
          HOST: ${{ needs.deploy.outputs.publicIp }}
        with:
          filename: ./tests/k6.js
Running the Workflow 🔗
At this point I’ve got a full GitHub Actions Workflow for deploying some infrastructure, running a resiliency test against it and measuring the result. My first test was to run it against my bad-lb-config branch (which, as a reminder, has a bug: the load balancer’s health probe is inactive meaning VMs are not removed from the backend pool when they are inaccessible) - you can see the result of the workflow here.
You can see that this run failed the k6 test despite passing the baseline test:
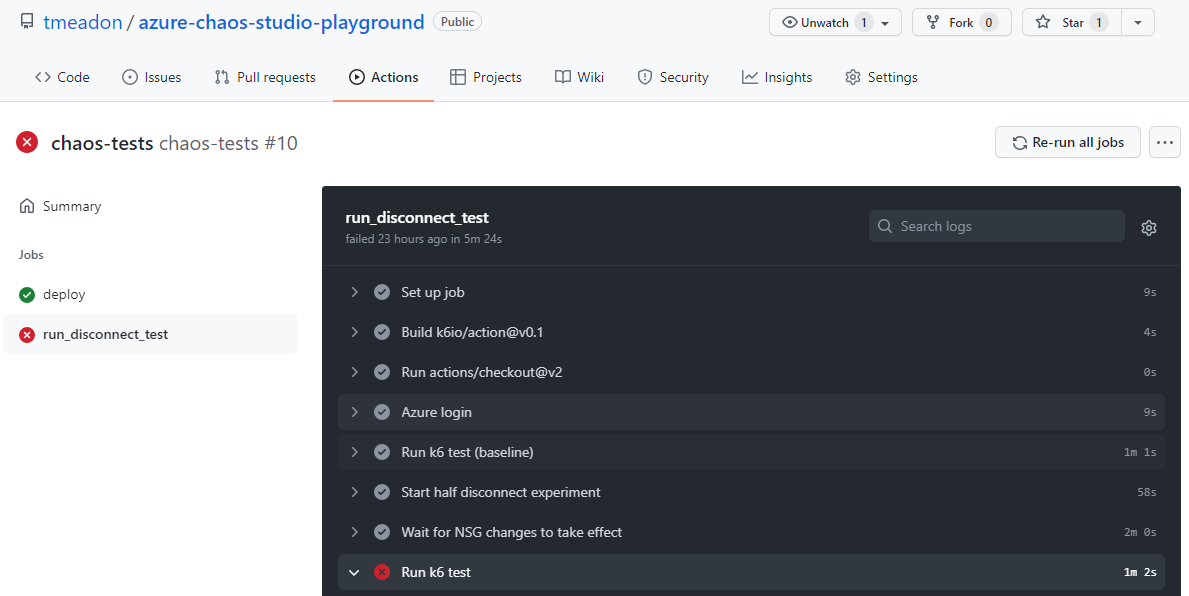
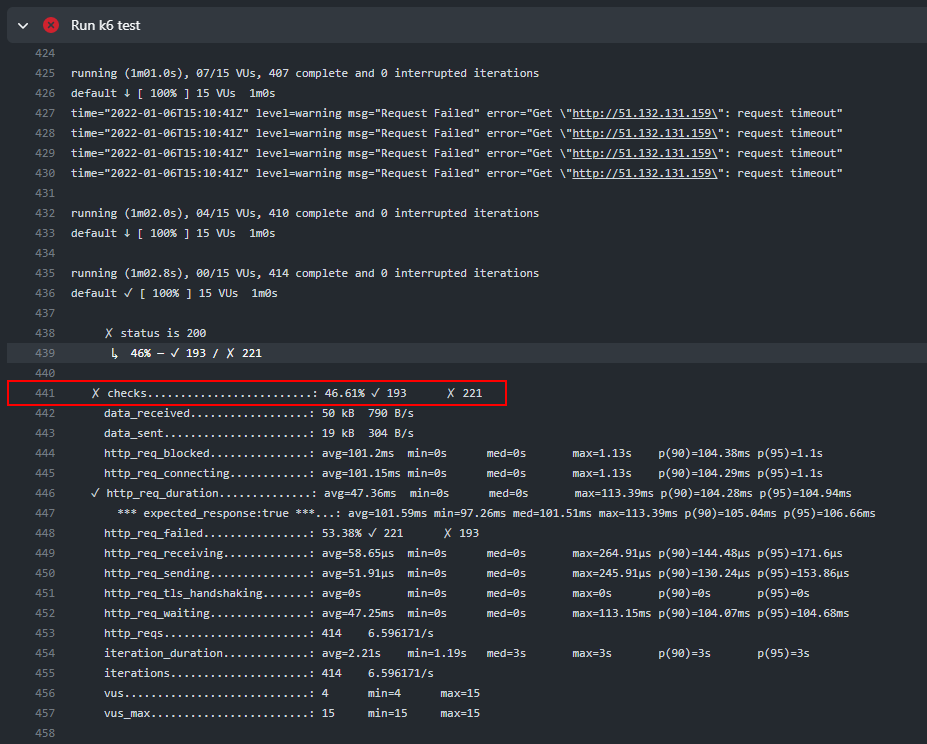
Looking at the logs from the failed step, we can see that only 46% of the test’s checks were successful - well below my target of 95%:
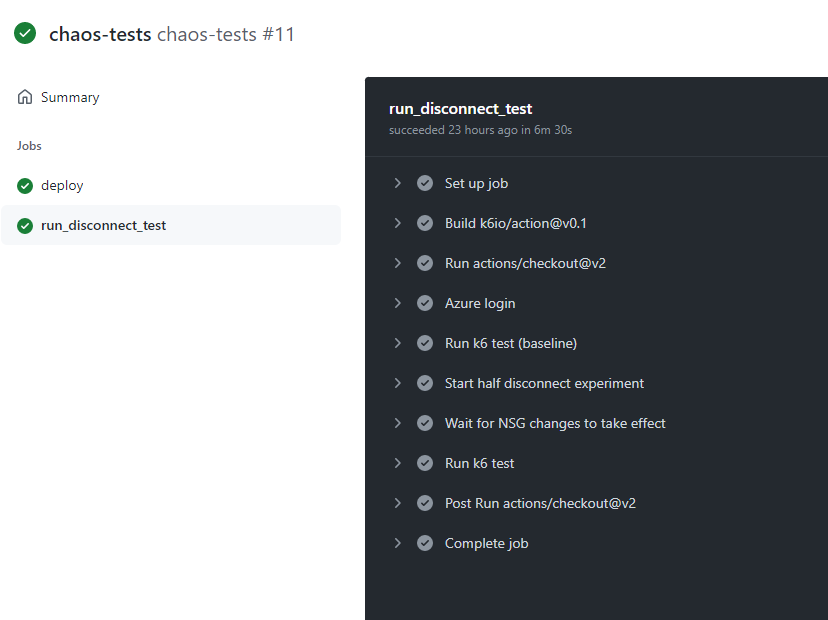
Now, running the Workflow again using my good-lb-config branch, we see a much brighter picture:
And that concludes this post! I’m now able to test my system whenever I like using the powerful triggering system built into GitHub Actions - I could run this test on every new tag creation, on every pull request or even on every commit if I really wanted (although I wouldn’t recommend doing so, it can take about 9 minutes or so to run). I would definitely recommend building automated resiliency testing into your development lifecycle - you can’t truly know how your system will respond to a failure without actually testing it. I hope this post provides you with a good starting point!