Wy wife and I live in a small, fairly calm town in the UK and we love it - the peace and quiet suits us perfectly. That being said, everyone needs a dose of chaos in their lives from time to time, so this weekend I decided to take a look at the preview release of Azure Chaos Studio to find out how I can use it to breach the peace of my Azure deployments 😇
In this post I will explain how to build a basic Chaos experiment and use it to kick the tyres on a simple Azure deployment.
I’ll be using Bicep (if you haven’t checked Bicep out yet then I would highly recommend you do so - you can start here) to provision a Chaos Studio Experiment as well as the resources which will be the subject of the Experiment. All of the code can be found in this GitHub repo.
What is Azure Chaos Studio 🔗
Azure Chaos Studio is Microsoft’s answer to chaos engineering, a methodology made popular by Netflix for enhancing the resilience of applications and services, particularly those that are distributed in nature. According to principlesofchaos.org, chaos engineering can be defined as:
… the discipline of experimenting on a system in order to build confidence in the system’s capability to withstand turbulent conditions in production.
The notion is to evaluate the resilience of a system by intentionally injecting faults (such as simulated network failures, or high resource usage conditions) and measuring the effect. If we observe a negative impact on the system (such as increased HTTP error codes for example), then we can re-design it to add the necessary reinforcements to protect it from real-life failures of the same nature.
There are a number of OSS tools available to help you practice chaos engineering, such as Netflix’s Chaos Monkey and LitmusChaos, and of course there’s nothing stopping you from writing custom scripts to simulate specific failures. This is where Azure Chaos Studio comes in - it offers a fully-managed service which enables you to perform chaos experiments in a safe and controlled way. Chaos Studio has several important benefits:
- Integration with Azure Resource Manager - Chaos Experiments are first-class ARM resources which means they can be managed using ARM templates/Bicep, governed using Azure Policy and RBAC and monitored using Azure Monitor
- A library of pre-canned faults - Chaos Studio has a fault library containing a number of faults, you can find the list here - we can expect this list to grow a lot as this service becomes GA
- Flexible experiments - it is possible to build up complex experiments so that you can more accurately replicate real scenarios
- Controlled execution - experiments can be easily stopped and rolled back if needed, and there are stringent onboarding and permissions requirements to ensure only authorised resources are targeted
Go and have a look at the documentation if you want to find out more about Chaos Studio. We’re going to move on now and look at an example…
The Test Environment 🔗
Before we can start causing trouble we need to have something to experiment on. I decided to use a familiar architecture as a subject for my first experiment - I deployed a pair of web servers running a very basic ‘Hello World’ Node.js application behind a public load balancer. The application responds to HTTP requests with a message containing the VM’s hostname. There is also an NSG attached to the VMs' subnet which allows inbound connections to TCP port 80.

This infrastructure was deployed using the Bicep files contained in the iac directory in the bad-lb-config branch of GitHub repo I mentioned earlier. Why have I used that name for the branch you ask? It will become apparent later, but the eagle-eyed among you might notice something missing from the load balancer configuration in lb.bicep… 😉
Building a Chaos Experiment 🔗
Before building an Experiment the first thing you need to do is to choose a fault from the fault and action library that you’d like to inject. There are two types of faults: agent-based and service-based. Agent-based faults require the installation of the Azure Chaos Studio agent on your VM(s) whereas the service-based faults operate against the Azure control plane.
I decided that I wanted to see the effect of one of my VMs becoming disconnected from the load balancer which should be something this design can tolerate. To simulate this scenario we can use the Network Security Group (set rules) fault to add a rule to our NSG that blocks inbound traffic to one of the backend VMs. Since this is a service-direct fault, we don’t need to worry about installing any software on our VMs.
Step 1: Onboarding the Target Resources 🔗
Before Azure Chaos Studio can start modifying resources, those resources need to be enabled as targets and the specific faults we’re interested in need to be enabled as capabilities. In our case, that means we need to enable our NSG as a target, and enable the security rule capability. This process is part of the multi-layered protection built into Azure Chaos Studio to prevent unexpected changes to your environment.
Chaos targets are extension resources which are created as children of the resources that are being enabled in Chaos Studio. The name of the target correlates to the name of the fault provider for the fault we’re looking to enable - in our case it will be called Microsoft-NetworkSecurityGroup.
Capabilities are child resources of targets and represent the fault that they enable. The name of the capability that we need to enable is called SecurityRule-1.0.
To enable my NSG in Chaos Studio I wrote a simple bicep module - nsg-capabilities.bicep - that will create the Microsoft-NetworkSecurityGroup target and the SecurityRule-1.0 capability on a given NSG:
param nsgName string
param location string = 'uksouth'

// get a reference to the existing nsg
resource nsg 'Microsoft.Network/networkSecurityGroups@2021-03-01' existing = {
  name: nsgName
}

// create a 'Microsoft-NetworkSecurityGroup' target on the the nsg
resource nsgTarget 'Microsoft.Network/networkSecurityGroups/providers/targets@2021-09-15-preview' = {
  name: '${nsg.name}/Microsoft.Chaos/Microsoft-NetworkSecurityGroup'
  location: location
  properties: {}

  // create the capability
  resource setRules 'capabilities' = {
    name: 'SecurityRule-1.0'
    location: location
  }
}
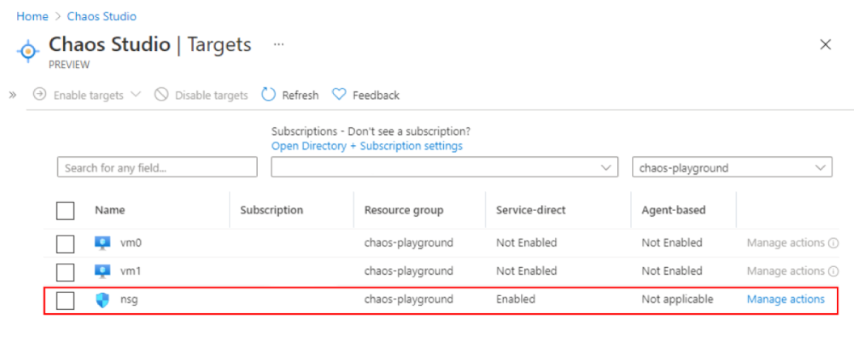
After deploying that bicep module, we can see that our NSG has lit up in Chaos Studio in the Azure Portal:
Step 2: Creating the Experiment 🔗
Chaos experiments are made up of two sections: selectors and steps. Selectors are groups of target resources - such as a list of VMs - and steps define what happens to those resources. Steps run sequentially and can contain one or more branches which run in parallel. Each branch contains one or more actions which are the actual faults that you want to inject and often require parameters. This structure allows you to build quite complex experiments - we, however, are going to keep things very simple. We’re going to build an experiment with one selector containing our NSG and one step with a single branch and a single action.
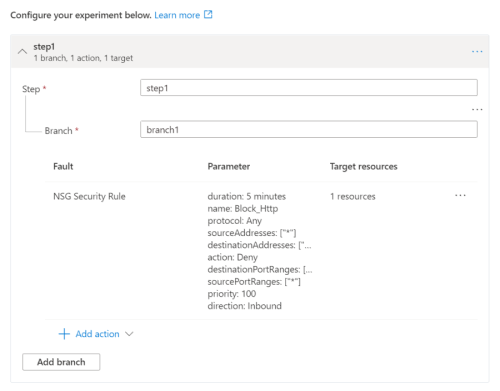
The bicep module disconnect-half-vms.bicep takes a list of VM private IP addresses and configures a chaos experiment which will add a rule to our NSG which will deny all traffic to half of the IP addresses for 5 minutes. Once deployed, the experiment looks something like:
Step 3: Assigning Permissions 🔗
Before we can run the experiment we need to assign the associated system-managed identity with the permissions it needs to modify the NSG. In the fault provider documentation, Microsoft suggest providing the experiment’s identity with the ‘Network Contributor’ role for this particular fault. I’m going to take them up on this to keep things simple, although in reality I would recommend crafting a custom role with the specific NSG-related actions - the ‘Network Contributor’ role feels quite wide to me.
The bicep module disconnect-half-vms-perms.bicep applies the necessary permissions. It is called by the disconnect-half-vms.bicep module which passes in the principal ID for the experiment’s system-assigned identity.
Running the Experiment 🔗
Now we can actually run the experiment. At time of writing there isn’t any support for Azure Chaos Studio in the Azure CLI or Azure PowerShell, so to start the experiment we can either use the Portal or use the REST API.
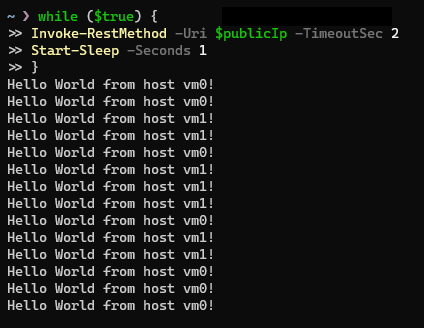
To observe the effect of the experiment I’ll use the following piece of PowerShell - which will loop forever calling the load balancer’s public IP, outputting the message returned by the Node.js application and then sleeping for a second.
$publicIp = '<load_balancer_public_ip>'

while ($true)
{
    Invoke-RestMethod -Uri $publicIp -TimeoutSec 2
    Start-Sleep -Seconds 1
}
Below is the output of this code before starting the experiment - this is our baseline. You can see the load balancer is fairly evenly routing my requests to the two backend VMs:
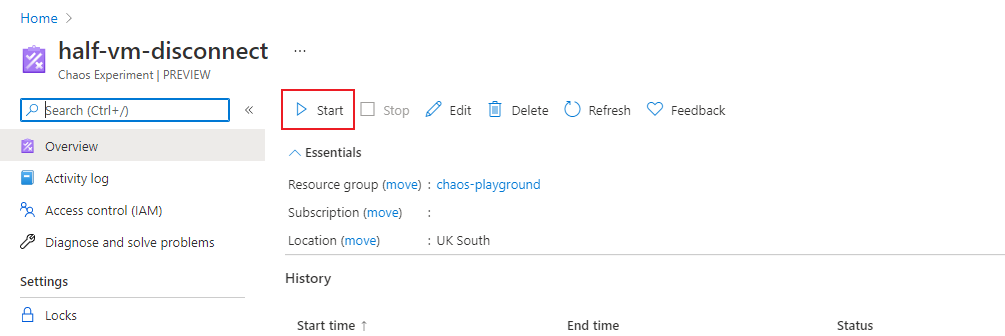
Now, I’ll start the experiment.
After a few seconds I checked the NSG and I could see a deny rule had magically appeared - as expected:
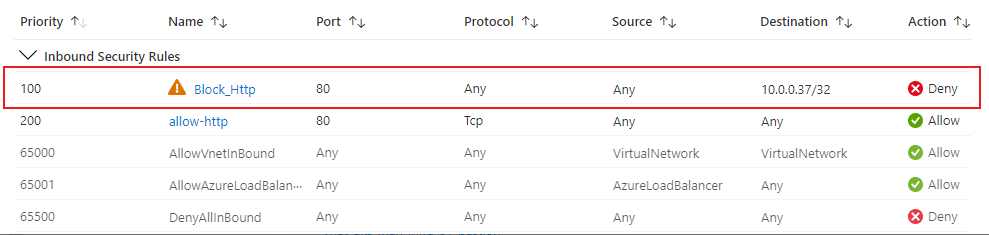
What I didn’t expect however was to start seeing requests timing out in my rudimentary monitor…
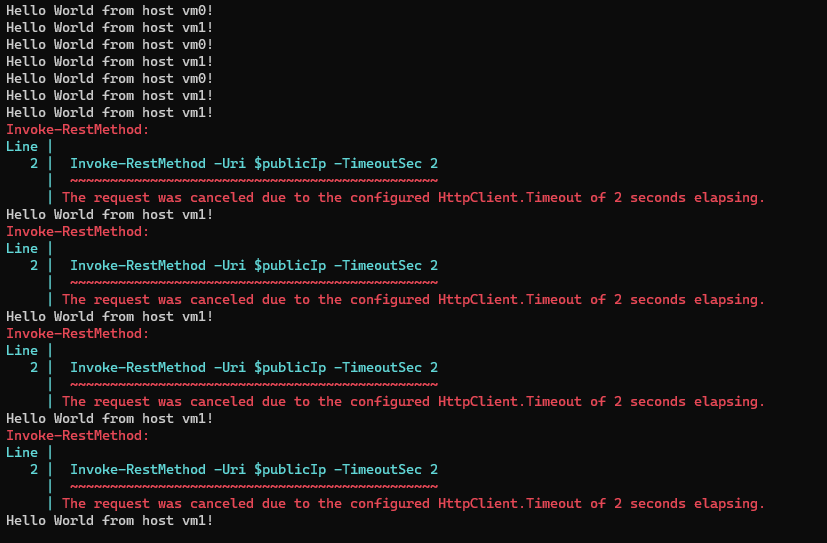
Since roughly half of the requests are failing, it looks like the load balancer is trying to route requests to both VMs despite one of them being disconnected by the NSG rule.
Outcome 🔗
My chaos experiment has identified a bug in my infrastructure design - the load balancer should be detecting that one of the backend VMs is offline and should stop routing requests to it. Clearly half of my requests are still being forwarded to the disconnected VM which is why they are timing out.
The issue is quite easy to spot in this case: whilst I have defined a health probe in my load balancer, I have forgotten to link it to the backend pool configuration! Doh…
I have fixed this bug in the lb.bicep module in the branch called good-lb-config. When I ran the experiment again after fixing this bug I saw a couple of failed requests whilst the health probe kicked in, but as soon as it did all of my requests were (correctly) being forwarded to the VM that hadn’t been disconnected. After the experiment finished I observed the affected VM serving requests again.
Whilst this is example is somewhat contrived, it does show how practicing chaos engineering can lead to important discoveries about the design of a system. The bug I found here is something that should be easily spotted in a peer review, however in more complex systems, bugs with a similar potential impact could be much more difficult to detect. Thorough resilience testing should be as commonplace as load testing, which is something that is frequently found in application release processes. Azure Chaos Studio provides a great framework for doing just that.
For those of you that made it to the end, thanks for reading. In part 2 of this mini blog series I’ll be looking at how to use GitHub Actions to perform automated resilience testing - stay tuned!